Have your web hosting account set up (GoDaddy is recomended, unless you already have a web host that you are using).
Install the Firefox browser, and use it as your primary browser when doing your web development.
Install the various HTML editing software that you will be using such as Brackets, Notepad++, or you may simply use the code side of Dreamweaver.
Install the File Transfer Protocol client program FileZilla (you need the client version, not the server version). This program is used to transport files to and from your computer and a remote server such as your web account with GoDaddy. It is what you will use to upload and manage your files on your web host.
Create, and upload to your web host, a web page named index.html with Headings, Paragraphs, and Links (these links on this page are only temporary so you can use whatever you like for now, one suggestion would be the w3chools website). This page will be the home page (landing page) for your project website that you will be building throughout this course. This will be your personal/business website that you will use to represent yourself as a professional artist, web developer, Photographer etc... This will be a live site, so do not include personal information, such as your personal cell number, address, etc... The page will develop as the course progresses.
Email the url of your website to me: flash.johnson@my.gcu.edu.
Your Assignment for this week will build upon what you did last week. First make sure all the requirements for Web Project 1 are all fulfilled.
Project
Use Styling to modify the attributes of your index.html page. Demonstrate and use the 3 levels of styling,
In-line (in the html element itself using the style=”…” attribute). This is normally used on items that do not occur more that one time.
Internal / In-page (using the <style>…</style> element). This is normally used in items that only occur in the one page that they are in and not in other pages in the site.
External stylesheet. Your external stylesheet should be called something like mystyle.css and should be in the same directory as the index.html page.
Place a <div> tag to contain all the content that is on the index page. The opening <div> tag is to be placed just after the opening <body> tag. The ending </div> tag is to be placed just before the ending </body> tag. This <div> tag needs to be styled from the external stylesheet and have the class name content. The styling needs to define the width to be about 800px (whatever works for your site) and it needs to be centered. The way that you center a block element is by setting its margin to be auto. So the styling for the <div> tag will look like this .content { margin:0px auto; width:800px; }.
Modify the body background color, Headings, Paragraph font face, color, size, etc…
Add images to your page, and be sure to place your images in a sub-folder called "images" (lowercase “i”). The images folder is to be placed in the same directory as your index.html file. Once the images folder is placed in the directory web pages can access images in that folder like so: <img src=”images/imagename.jpg”>
Create two other pages by saving copies of your index.html page as links.html and about.html.
On the links.html page create an unordered list <ul> of 20 links to places that you often visit on the web. The first four of these links have to be the following:
Create a basic navigation bar that contains the links to the three pages, index.html, about.html, and links.html. A good way to do this is to use an unordered list and put the links in the list items. You then can style the list to not have the bullet point by defining the {list-style-type: none;}, and you can style the <li> to make them display on the same line by defining the {display:inline-block;
margin: 0px 0px; padding: 0;}. This whole navigation should be placed inside of a <nav> tag and centered on the top of the page. You can then copy it and paste it in the top of each of the pages. It can be placed just after the containing <div> tag so that it is the first part of the content in the content div, or it can be placed just in front of the containig div so that it is not confined by the div's width. Test it and make sure that it is working, you should be able to navigate between the three pages, and the navigation should not move or change in any way from page to page.
Your Assignment for this week will build upon what you did last week. First make sure all the requirements for Web Project 2 are all fulfilled.
Project
Pseudo classes
Give the Main Navigation a class name of main, and style it in the external stylesheet using the pseudo classes:
.main a:link,
.main a:visited,
.main a:hover,
.main a:active.
You will also be styling the <nav> <ul> <li> it will look like this in the stylesheet:
nav.main {...}
nav.main ul {...}
nav.main ul li {...}
nav.main ul li a:link {...}
nav.main ul li a:visited {...}
nav.main ul li a:hover {...}
nav.main ul li a:active {...}
Put a <div> around your links on your links page and give it a class of links. Then in the external stylesheet create that class like so to style all your links in that div.
.links ul li a:link {...}
.links ul li a:visited {...}
.links ul li a:hover {...}
.links ul li a:active {...}
Tables
You will use tables in two different ways, one to create a tabular data display, and one that is used to create invisible scaffolding for layout purposes.
Create a table with tabular data, like you would have in an excel spreadsheet. Style it to look very nice. It should have borders and coloring to make it aesthetically pleasing and the content should relate to your site somehow.
Create a table to act as invisible scaffolding used to layout the content on that part of the page. Filled it with content like text, and images. To get a good idea of how to design the layout of this table you should sketch it out on a piece of paper and then do the table creation to match your sketch. It needs to be impressive and meaningful, don't just throw something on the page or I will just throw some little grade your way. The idea here is not to highlight the table scaffolding but the content that it is being used to arrange and present. So no boarders should be used for this one. You might think of it as glass cells laid out to arrange and hold your content as you want to lay it out on the page. This design must fit within the div tag width that you defined for the width of all your page layouts. You can do this by setting the width of the table to be smaller than the div, but your content can push it beyond this point so be conscious of that.
Tables are not supposed to be used as your primary goto element for building the structure of a web page, using divs and alignments is, but sometimes tables offer a more efficient way to solve a problem, so you need to be aware of what can be done with them, at one time this is how all good html layout design was done for lack of better ways to do it.
Divs
On a lower part of the page create a div and inside of that div use divs to create layout using set widths and floating, display styling etc... (THIS SECTION STILL NEEDS TO BE DEVELOPED)
Among your research you should study,
Tables and all related CSS styling
The Box model concept and all related CSS styling and corresponding CSS such as width, margin, background color, etc…
CSS centering (centering block elements, and centering content within an element)
Do not give me the bare minimum, spend time to make your site look good, this is not the class work, this is your website that you are building make the content true and related to your site. Style things tastefully and aesthetically pleasing.
Your Assignment for this week will build upon what you did last week. First make sure all the requirements for Web Project 3 are all fulfilled.
Project
For this assignment you will add to your Project
Background image
This is to be an image that you take yourself, or that you create yourself in Photoshop, you must own this image. You can use an image that you find on-line but you must modify it to a point that it is nothing like what it was when you started. You must take into consideration how the image is going to work with your content and the width of your content. It should not distract from your content, so having it soft, or blurry is a good choice, but you could have it a little blurry or soft in the center and then let some detail on the sides were the content will not be. It must be carefully and intentionally placed. Decide how you want it to display, do you want it tiled or non-repeating, do you want it to stay in place when the user scrolls down, or move with the content, do you want it placed left, right, or center? Do you want it top or bottom? Or perhaps you might want it to fill the screen whatever size it is either by width or by height or both. Whatever you do it must be thoughtful and you must be able to defend your decision for doing it that way.
Add images to your pages. You could make a portfolio page displaying all of your creative work, or a couple of pages if you have enough content. Try to use graphics or images on all of your pages. Create thumbnails for some of your most used link pages and use them as buttons for the link, see my links page for example. Try to incorporate a personal logo into your page, in a tasteful way.
Make sure that all your images are properly sized and compressed in Photoshop, do not use HTML to size your pictures use Photoshop to size your images exactly as they should be. Use Image Size to size them, and Save for Web to compress them. If you are saving as jpg, 60 is a good compression, a happy compromise between quality and compression. One exception to this is for a background image that is set to fill the window as it is adjusted. In this case you would have it a little smaller anyway because it is a background image and should not have a lot of detail anyway, you may also consider it to be a little blurry but that is up to your design aesthetic, but whatever you do must be warranted.
Use styling to further make your site look good. Tastefully use border-radius, background-color, and shadowing for both the elements and the text to create depth, and any other styling effect that would tastefully add to the pleasing aesthetics of the site. Spend the time necessary to really understand how they work, and work out a nice style for your site.
Test your site on all the major browsers to see how it is looking. Hold control down and scroll in and out with your mouse to see what your site would look like on other size monitors (don’t skip this I will do this as I test your site and use it in the critique).
Make sure that your main body structure is exactly the same for each page. The content can be different but the background, the navigation, the footer area, the width of the content, even the header placements must be exactly the same.
Make your sites pages to have the horizontal scroll bar to be always on. This makes your site not jump around when you go back and forth between pages that have content that requires the scroll bar and those that don’t require it to have the scroll bar. You do not want your page doing anything to upset your user. If you notice, my pages are set this way, see if you can figure out how I did it, yes you have to figure it out.
You need to spend a lot of time on this, at the end of this assignment you should have a very nice looking site, but there is much more that we will be adding to it in the coming weeks. I am going to grade very hard on this so make sure you do a very good job.
Your Assignment for this week will build upon what you did last week. First make sure all the requirements for Web Project 4 are all fulfilled.
Project
For this week you will add:
One new main page
Three new sub-pages for the new main page
Content for the pages
Sub navigation for the sub pages
One of the sub-pages is to be named Hotspot, and you will put a graphic with an image map with several hotspots that links to an iframe on the same page click for example.
The sub-navigation needs to have at least three sub links. That means that you will be adding 4 new pages to your site. The first page is the one that shows when you use the main navigation to go to it. The other three are the ones that the sub-navigation goes to. (see the DDN300 link on my site for an example). This sub-navigation bar is to be constructed using the css rollover graphic technique that I showed you in class (for and example of how ot create these kinds of buttons see my instructional page and view the course buttons). You are to create your buttons in Photoshop or another graphics program. The content for these pages may be images and lorem ipsum place holder text, or perhaps some of your English Papers, or reports from other classes. If you use something like your own reports make the images you use be related to your work.
Make sure that the sub-navigation is in the exact same place on each page just like your master navigation is supposed to be in the exact same place on each page.
Your Assignment for this week will build upon what you did last week. First make sure all the requirements for Web Project 5 are all fulfilled.
Project
For this week you will:
Add one new main page with the title "Audio and Video".
Update master navigation on all pages to include the new page.
Acquire an audio file of some audio that is pleasant. It needs to be in both mp3 and ogg formats. You can do this with the Audition program that is part of the Creative Cloud, just open your file and then export it as an mp3 and as an ogg. You may use another program to convert the file also. You should have both versions and then place the audio files to your website folder, you can put them in a sub-folder called audio.
Create a new Gmail (email) account that you will use to create your YouTube account. Choose a username that is reflective of what you want your YouTube account to be like such as HighDesigns or Coolstuff or DidYouSeeThat etc... (don't give your personal information on the sign up)
Create your YouTube account with your new Gmail account that you just created - This should be real easy once you have your Gmail account created.
Use your phone to capture some interesting video that you will upload to your YouTube account. Keep it between 20 and 30 seconds and make sure it is tasteful and interesting. If it is longer than 30 seconds make sure that it is worth watching.
Use the tools provide by YouTube on the video's page to copy the code to embed the video in your website, and then paste it into your new page.
Use styling to make it centered and fit nicely into your new page.
Choose another video from YouTube (not your own) and embed it in your webpage.
Make sure that the web page is organized and nicely styled.
Your Assignment for this week will build upon what you did last week. First make sure all the requirements for Web Project 6 are all fulfilled.
Project
For this week you will:
You will create a form page. The form has to relate to your site, and it must be laid out and designed to be very efficient and aesthetically pleasing. Keep it's profile small, that means do not make it big and chunky, make it tasteful and elegant. Don't just have one input under the other, design the layout to efficiently use the space. Decide how you are going to designate the labeling, are you going to use just text, or the label element or perhaps have it as the placeholder to minimize the profile of the form. The form is to have each of the following types of fields.
text
password
check box
radio
radio with default checked
select element with specified size
select element as a drop-down menu
select element as a multiple choice (more than one can be chosen with control held down)
textarea element with defined size
a submit button, the default or one you make
In addition, you may also consider some of the other types as well.
The form should use the Post method and go to a file called form_processor.php.
For extra credit I would like for you to create the form_processor.php page and simply display the results of the data entered into the fields. As a PHP file it will work in your local server, and if PHP is running on your Host server it will also work there too. Be sure and make the displayed information nicely presented and styled.
Remember to create a new button for the form page in your main navigation, but do not create one for the results display page, as the way that you get to that page is through the form page.
A forms page is like the bathroom in an establishment. If you make it look nice, you will honor, esteem and impress your visitors, it makes them feel valued and important. It also makes your establishment look high class. Not to do so is a grave insult to the importance of your visitor. You want to make them feel like royalty.
Your Assignment for this week will build upon what you did last week. First make sure all the requirements for Web Project 7 are all fulfilled.
Project
JavaScript is used on websites for many reasons such as, doing things that styling along can not accomplish, checking form entries for content and valid format, and page control. It is also used to create programs like mortgage calculators, and games as well. It can also be use to take form data and change html element content and attributes including styling.
This week you will implement two kinds of JavaScript on your site, an interactive Box Model controller on a new Main page, and a simple form check validator on your existing Forms page.
JavaScript Controller:
For this part you are to create a new main page on your site and call it JavaScript.html and make a link to it in your master Navigation. You are to view this Box Model Wizard that I create with JavaScript and see how it works. Once you get the hang of it, view the source code and copy just the part that I have indicated in the comments and paste it into your new JavaScript page inside of your content div that you should already have set up. Study the logic of the code and then add 3 new feature controllers based on how the others are set up.
You are to add a:
Font Size Controller.
Text Shadow Controller.
Box Shadow Controller.
For the shadows you can just make the color to be black, so that means that you do not need to account for the color, but be sure and check all the attributes for the Text Shadow, and Box Shadow at w3schools, they are not identical, the Box Shadow has an additional 'Spread' option.
Part of this assignment may have you join variables that have number values with letters or symbols that are strings. This is done by putting a plus (+) between them, but the letters require that they be single quoted like so 'word' and thus it would look like this myvariable + 'letters' or like this example that you will see in the code for creating a color:
rgba(150,20,230,.6) - which you will recognize as an rgb color definition with an alpha.
Form Check Validator
For this part you are simply to implement a form check validator on your current Forms page. It only has to be targeting your Credentials login, so that means that you need to address the First Name, Last Name, and Password fields to confirm that they have been filled out. Use this link to assist you in setting this up.
For extra credit add an email field and find an email validation script online and implement it to check if the email entered is a valid format, i.e. name@here.com.
Your Assignment for this week will build upon what you did last week. First make sure all the requirements for Web Project 8 are all fulfilled.
Project
For this week you will:
implement Search Engine Optimization techniques apply a Pring Media Type and work with Website Analytics.
Search Engine Optimization Assignment:
You will place and populate the meta tags on at least your index page.
Word your page’s content to reflect what you are expecting people to be looking for when searching for your site or the services you provide. This would include your titles (headers), copy (text) image names, and even image text descriptions.
Place your classmates links on your pages in the form of an include just before the body end tag to help them be considered important, as they will do the same for you. Remember that you do not have to actually have anything in between the “a” element so it does not have to show, but if it did that would be up to you.
Go to Google and with your Gmail account that you registered earlier for the video assignment, use the below links to register your site with Google’s search engine. Be sure to include key words like you did for the meta tags so that people can find you on Google. For example: Your Name, Phoenix, web design, photography, quality, etc...
Continue to refine your overall site to make it look more cohesive and nicely styled. Go through the tutorials that we discussed to continue to learn about HTML and CSS. Also focus on specific things that you would like to make happen in your site and try to research how to do them and then implement them.
Print Media Type Assignment:
You are to create a print Media type CSS rule that removes the navigation from printing when a user does a print or a print preview. Navigation is necessary for a wepsite, but it just takes up valuable space on a printed paper. Here is a copy of the example that I gave in class.
Website Analytics Assignment:
Second you are to Set up an account at a Web Analytics site to track the users who visit your site and what they are clicking on, where they are from and whatever other information you can view to help you better understand how people are using your site, and how successful it is. You can use Google Analytics or GoStats. GoStats is what I used on my Instructional website. If you view the code you can see it on the bottom of my pages. You will be getting code from this Web Analytics website that you will paste into your pages. You are to create an include file like you did for your navigation and place this code into it. Then you will use an include statement to refer to the include file for every page of your website. The include statement should go on the bottom of your pages, just before the end </body> tag.
You may be tempted to bring over code that puts a counter in it, but resist that urge. You will be able to see how many people have visited your site when you check on the statistics, and you really do not want to show or inform users of how many people visit your site.
Continue to refine your websites to be efficient, aesthetically pleasing, interesting, and useful.
It can be the same topic as the one that you have been building for the Class Web Project which would allow you to utilize the resources (images, text, etc...) that you have already created, or you may choose another topic.
Do some research and find four or five websites that have features, designs, functionality, or visuals that peek your interest and be appropriate for your site and see if you can incorporate some of those concepts into it. Remember that you are free to reverse engineer anything, but you are not fee to plagiarize it. That means that you must understand it and tailor it to make it your own.
The website is to be built as a real site, so that means that each page, and all content, must be belong in the site, and the site must contain all pages, and all content, that should be in the site, it must be complete. Do not include any of the stuff that you created for the Class Web Projects unless it is applicable.
Also you must be considerate of your design choices, consider your navigation, layout, environment (background), titles(headings), page navigation, sub-navigation, overall look, etc... Don't just copy over what you did for your Web Projects. Consider what would be the best way to do something, and then do that way. Spend time sketching out your site pages on a piece of paper to get an idea of how you want it to be laid out and then go find the best way to do that. Be sure also to utilize the precious screen real estate, do not waste it with clunky navigation and poorly designed titles.
Make your site interesting, consider how you might use some of the techniques like image hotspots and iframe content. Also use Photoshop to create interesting PNG files that utilize gradient transparency to create cool graphic visuals for your page. However if something does not make sense then do not do it.
Among the pages on your site, you must have:
Home
Contact
Links
Your Class Web Project, that you worked on all this semester, is not to be deleted, but it is to be moved to a sub folder and a link to it is to be located on your new site so that I can access it easily. You could put that link in your links page.
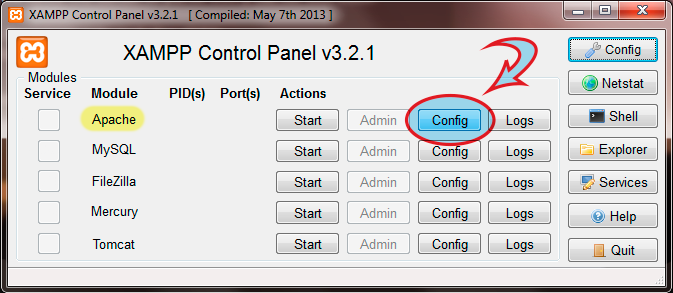
In order to make the webserver parse every html file for Server Side Includes you need to modify the config file (httpd.conf) that controls this setting. This file can be accessed one of two ways, by going through the control panel's Apache config button, or by locating it directly in the xampp file directory. The following examples are for Windows, but the procedure is very similar for Mac.
1 To access it through the Control Panel, simply select the config button on the Apache Module as shown below, and choose Apache (httpd.conf).
2 To access the file directly, go to the xampp folder directory, and locate the file:
\xampp\apache\conf\httpd.conf
Like HTML, this file must be edited in a text editor, not a word editor. Once opened, do a (control/command + F) and type "shtml" to do a find and locate the bellow code. You will need to delete the two s letters that are indicated in green below. Once done and saved it will force the server to parse every file for SSI code.
# To parse .shtml files for server-side includes (SSI):
# (You will also need to add "Includes" to the "Options" directive.)
#
AddType text/html .shtml
AddOutputFilter INCLUDES .shtml
These direction are for a Lunix hosing site with GoDaddy with cPannel.
Login to your GoDaddy account online.
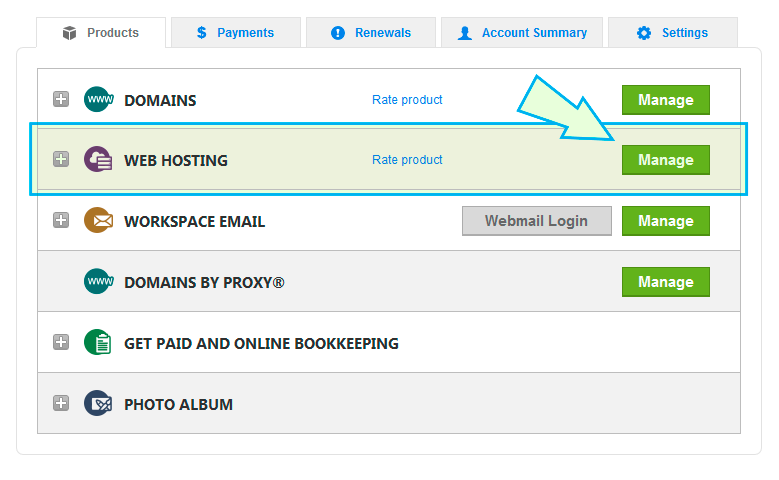
Locate the list below and select Manage on the Web Hosting area.
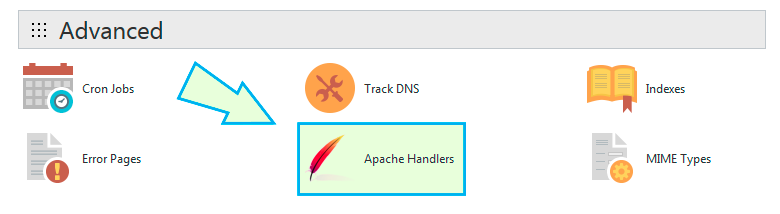
Select Apache Handlers under the Advanced section.
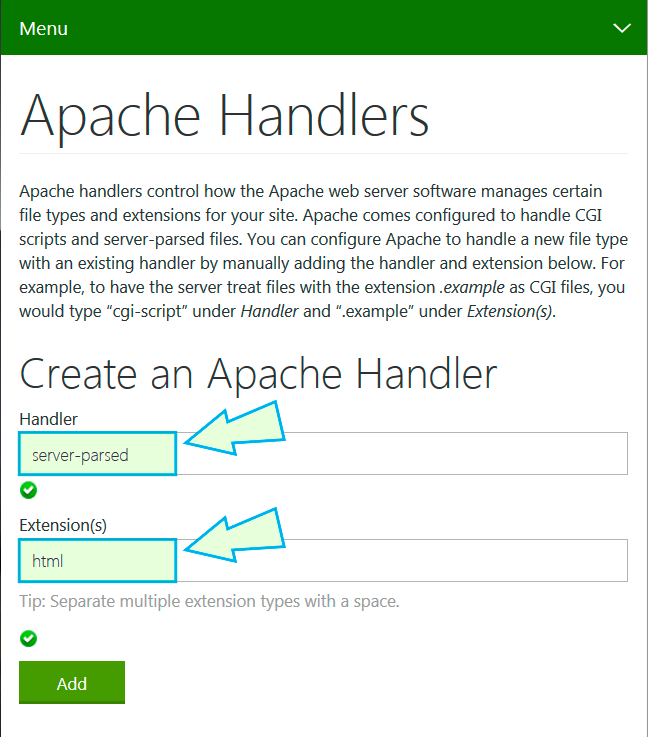
In the Handler field type server-parsed, and in the Extensions(s) field type: html. Then hit the Add button. This will make the server parse all html files for Server Side Includes. It does this by generating a file called .htaccess with the following code: AddHandler server-parsed html. It then places this file in your root web directory. You actually could do this manually by creating the file yourself and uploading it to your server.
To remotely connect to a GoDaddy account via FTP, an FTP account first needs to be set up in the GoDaddy account. Once this is done those credentials can be used to set up a FileZilla connection.
Below are some more directions to give you guidance.
Login to your GoDaddy account online.
Locate the list below and select Manage on the Web Hosting area.
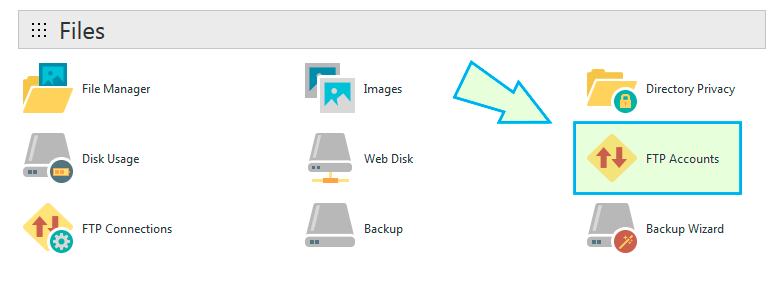
Select FTP Accounts and then set up an FTP account and make note of the credentials that you create and that are generated for you.
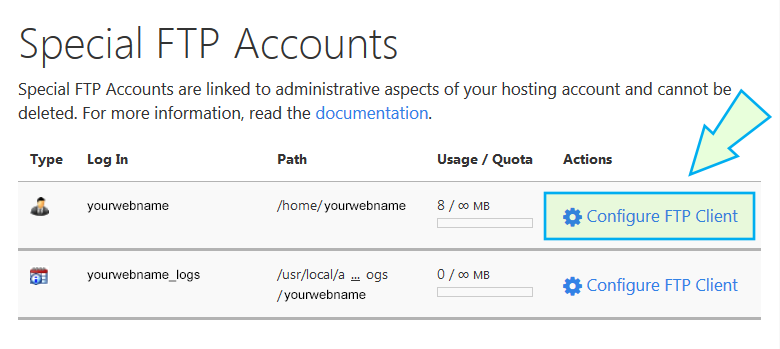
Do not add a new FTP account, but instead scroll down past the form to the Special FTP Accounts section and select the Configure FTP Client link to reveal the FTP account credentials that you will use to set up FileZilla to connect to your GoDaddy web space.
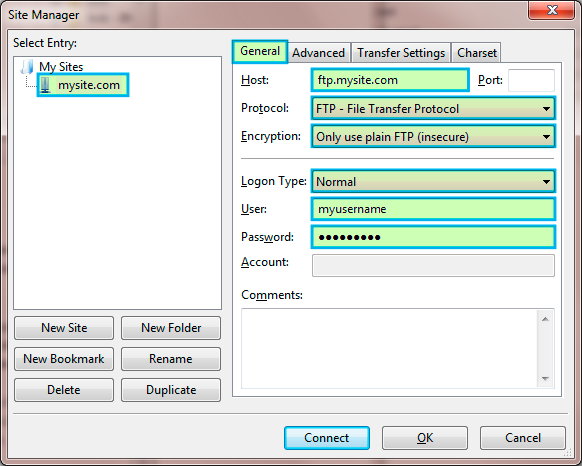
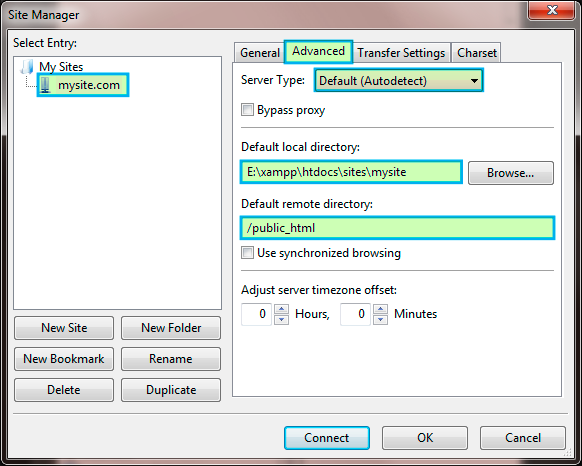
Once you have the credentials from the main FTP account including your Host:, Username:, and Password:, open up FileZilla and select the Site Manager Icon: File > Site Manager. Below are the two tabs you need to fill out, the General Tab, and the Advanced Tab.
Make sure that you fill out the Default local directory to correspond to your website location on your local computer. This makes FileZilla automatically choose your website directory location when you connect.
 2 To access the file directly, go to the xampp folder directory, and locate the file: