Install the Firefox browser, and use it as your primary browser when doing your web development.
Install the various HTML editing software that you will be using such as Brackets, Notepad++, or you may simply use the code side of Dreamweaver.
Set up the web development XAMPP Server on your laptop computer.
Make your local XAMPP server to parse all html and htm files for Server Side Includes.
Make your host server to parse all html and htm files for Server Side Includes (SSI). While you are at it also make your host parse all html and htm files for PHP. You might be able to do this yourself using a mechanism that they provide for you or you may need to call their technical support. If it is a situation where they need to do it as a server setting on their end, try to make sure that they take care of it promptly, hopefully while you are on the phone with them.
Convert all your navigation, including main and sub-navigation, to Server Side Includes (SSI) to maximize development and production efficiency.
Install the File Transfer Protocol client program FileZilla (you need the client version, not the server version). This program is used to transport files to and from your computer and a remote server such as your web account with GoDaddy. It is what you will use to upload and manage your files on your web host.
Once you have chosen your site to review post its URL in the class forum so that other students know that it is taken.
Write a review that assesses the functionality of the website based upon effective web design principles.
Discuss what functions you would find value in replicating for your own website and why.
Describe how these websites take into account the human factors that contribute to an effective user interface design.
Describe how design decisions could be improved given specific human factors. The URL should be placed as a header link, and open the website in a new window.
This assignment is to be posted as a webpage on your web domain (the other assignment that is due this week). It should be named WebCritique.html. You are to create an index.html page for your Domain with a link on it going to the WebCritiqe.html page. The title of this page is to be <title>Your Name Web Critique</title>.
Email the url of your website to me: flash.johnson@my.gcu.edu.
This week's project will be to create the basic website that will serve as the landing page for your project work this semester.
Project
For this week you will:
Sketch out, design and create a simple website with at least 3 main pages.
A Home page (main landing page) - This page can have links to all of your projects, so include on it a link to your Web Critique.
A Links page.
At least one other page. It could be an About Page or some other page that you would like to include in your site. Another possibility is that you could create a dedicated page that links to your projects instead of having them on your Home page.
Create a main navigation bar that links between the main pages. This navigation must be an external file that is inserted into your page using the Server Side Include statement. The navigation needs to be such that it stays at the top of the page even if the page is scrolled down. See my page for an example of how to accomplish this, don't copy my navigation just reverse engineer how it works and apply the functional concepts to your navigation.
Submit to LoudCloud, the URL of your project home page, a jpg picture of the sketch design of your site, and a screenshot saved as a jpg of the finished Home Page.
This week we will be doing a study in HTML & CSS dropdown menu design and building.
Because we only meet one time this week you need to go through (work through) the tutorials below before we meet on Wednesday so that we can be ready to go.
Project
For this week you will:
Create a generic page with a dropdown menu that has many, many links and at least 3 levels of drop down. The links can be dummy links with the # as the url. This needs to be substantial and creatively styled and built, and must be unique to you, don't copy from each other. They are also not to look and feel like the tutorials that I have supplied below, they need to be your own creative look and feel. First do a little research and then draw out your concept on paper, then build it.
Be sure and link to your dropdown page from your lessons project page on your class site.
Take a picture of your sketch and a screenshot of the dropdown with the mouse hovering over the lowest level of the dropdown menu so that is shows in the screenshot.
Submit the screenshot and picture and url to LoudCloud in place of the WordPress assignment.
This week we will be doing a study in Responsive Layout Design.
Project
For this week you will create a web page that employs Responsive Layout Design.
Sketch out your layout on paper.
Use Media Queries, max-width, min-width, float and other CSS techniques to accomplish your design build.
Do not use Bootstrap or any Javascript for this.
For the week 4 assignment in LoudCloud, submit an image of your sketch, and three screenshots of your final design, each one at a different width in order to demonstrate the responsive nature of the layout. Also include the url to the page, and have a link to it from your projects links of your class webpage.
This week we will be doing a study in visual and interactive Special Effects
Project
For this week you will create a study page of the Filters, Transforms, Transitions, and Animations, and then create a webpage that incorporates at least five of these effects aesthetically and appropriately:
Work through the tutorials below on a study page that you create to house all the effects that you work through. Keep the related CSS next to its HTML, do not put it in an external page, this will make it easier for you to reference the related code. Title each item a with header <h1> and put your notes and comments after the effect.
After you have played with, and written the code examples of the Filters, Transforms, Transitions, and Animations on your study page, think about how some of these effects can be used on a real webpage.
Sketch out a page that illustrates how you will build this page
Build out the page, you must use at least 5 of the effects on the page in an intentionally designed way.
Below is an example of the filter and transition effect that is assigned to this whole project box. It is what is controlling the fading in of the box when you hover over it with the mouse. It is written in shorthand so that you have three filters being defined in one statement, the grayscale filter, the blur filter, and the opacity filter. On hover the grayscale goes to zero effect, the blur goes to zero effect, and the opacity goes to full, all in 18% of a second.
You will now build your business website to represent you as a web designer/builder. This is not to be considered just a project for this class, but your real business site. You will latter use this site to procure a client for a website that you will build as your final project that is due at the end of this class (but that is a separate assignment from this one).
Project
For this week you will:
Research the web and choose at least three sites of professional website designers/builders that exhibit excellent features, function and content from which you can find inspiration and direction. Consider things like packages that you might offer, various services such as video supplementation, or graphic design or even business image development if that is something that you would offer along with your web services.
Write a consise creative marketing brief for your website project, a list of requirements for your site, including your target audience and what it will take to implement etc...
Create a site map graph in Adobe Illustrator, outlining all the pages that will be in your site and how they relate to each other. Example
Use Adobe Illustrator to mark up your wireframes for the main layout designs that will be on your site. Example
Start building your site.
First week deliverables to be submitted to LoudCloud:
Your professional inspirational links
Your Creative Marketing Brief
Your Site Map - made in Adobe Illustrator - submit a PDF copy
Your Wireframes - made in Adobe Illustrator - submit a PDF copy
This week we will be designing and creating a functional contact page for your business website. Deliverables will consist of a wireframe design of your Contact page (created in Illustrator or another comparable program), and the Contact.html page itself.
This procedure will require an email account to be set up on your hosting site. You therefore need to create an email account on your hosting site to receive the contact information that will come in the form of an email. It could be something like FirstName@yoursite.com
Once you set up the email account, you can access it by using the web interface that is provided by your host. However you should also be able to have it accessed by an email client like Mozilla Thunderbird that you can install onto your computer. Thunderbird can be used to manage multiple email accounts from many different sources; it is a good email management solution. You may need to talk with your host provider to help you get Thunderbird to access your web mail. This link may help.
This assignment may require you to do a refresher on forms and the many input options that are available that you should have learned in web 1. The following resources will help to give you a refresher course if you need it.
Wireframe your contact page. In addition to the actual contact form, consider all the contact info such as your business phone number, email, address, etc... that you might want to have on the page and where it will be placed.
Build out your page. Refer to my example contact page to see how the contact page functions. Note that you must save it as a php file for it to work correctly on your host site (that is, unless you have managed to get php to be parsed for all html files). It is very likely that your ssi includes will not work because your server is not set to look for SSI inside of a php file. This means that your Navigation includes will not show up. You could try to make the server parse php files for ssi as well as html files, or you could simply put php include statements in this php page where all of your ssi includes for your navigation are now located.
A php include statement looks like this:
<?php include 'i-filename.html';?>
You are also to make the subject field to be a pull-down menu input instead of a general text field. Among the options in the pull-down field, you are to put the services that you offer as well as other reasons why someone might contact you through your business website.
Your contact form should not look like my example, you should lay it out to match your wireframe design and style it to match your site.
Submit the Wireframe image to LoudCloud, and include a url link to your Contact.php page too.
This week we will learn a little bit about working with JavaScript by incorporating a small, premade, JavaScript application into either your Assignments Page, or your Business Site if applicable. You will not be writing the JavaScript code per say, though you may modify it, if you wish (if you know how to do so), but you will be focusing on the layout and styling of the element. A Debt Calculator example has been provided for you to use for this project, but if you wish, you may find a different application that better suites your purposes. There are many free online resources for JavaScript applications that you can choose from:
Wireframe your application page using Illustrator or comparable program. Once you have decided upon an application to incorporate into your webpage, study the working example of it and take note of all the elements that make it up. Arranged and lay it out in the the best way possible for user interface.
Incorporate the JavaScript into your page, modify the layout and styling to match your Wireframe and site theme. Do your best to make it as simple as possible to interact with and pleasant to view.
Submit the Wireframe image and a screenshot of the page to LoudCloud, as well as a url link to the live page.
Your are now going to design and build a real live client site. By now you should have secured a client for this Final Project. You will be using all that you have learned to create a custom HTML/CSS site for your client. This site must be created by you using HTML and CSS, it may not be a content management system like WordPress or Joomla, and you may not use any pre-existing templates, unless you are the one who created them. This will be a major piece of your initial web portfolio, you will want to put your heart into for your yourself as much as for your client.
Project
For this assignment you will:
Meet with your client and get a strong sense of the requirements for the website.
Develop a Creative Brief outlining the project, a Site Map, and the initial Wireframes.
Clarify expectations between you and your client, do not promise more that what we covered in class, but there is a lot that we did cover. You may also do more if you feel confident to do so.
The site must have its own Domain Name, and be set up with an actual web account with a host such as GoDaddy. If they do not already have this you can help set it up. Try to see if the dollar a month deal is still in effect like you got, and do not let your client be cross sold do not let your client be cross sold on things they do not need.
You may only use images that the client has copyright permission to use. You may take any photos or they may supply their photos, or you may use royalty free images or stock photography that they or you purchase the rights to use.
JavaScript apps can be integrated into the pages of the site, but JavaScript may not be used in place of HTML and CSS.
Remember that you can use Video, and a YouTube account to power the videos as well, but it is not required.
First week deliverables to be submitted to LoudCloud - at the very least:
Creative Brief
Site Map - made in Adobe Illustrator - submit a PDF copy
Wireframes - made in Adobe Illustrator - submit a PDF copy
Supply the client with these items as well.
Also put these items on your Class Projects Page under a link called "Final Project - Client Site".
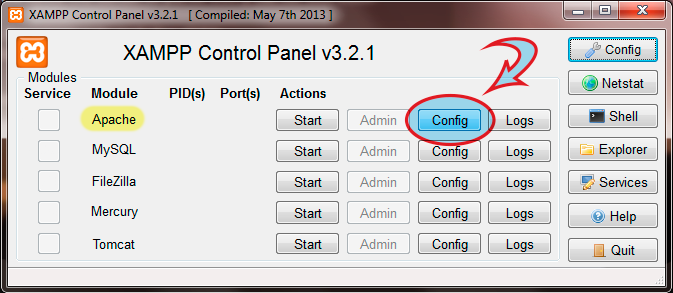
In order to make the webserver parse every html file for Server Side Includes you need to modify the config file (httpd.conf) that controls this setting. This file can be accessed one of two ways, by going through the control panel's Apache config button, or by locating it directly in the xampp file directory. The following examples are for Windows, but the procedure is very similar for Mac.
1 To access it through the Control Panel, simply select the config button on the Apache Module as shown below, and choose Apache (httpd.conf).
2 To access the file directly, go to the xampp folder directory, and locate the file:
\xampp\apache\conf\httpd.conf
Like HTML, this file must be edited in a text editor, not a word editor. Once opened, do a (control/command + F) and type "shtml" to do a find and locate the bellow code. You will need to delete the two s letters that are indicated in green below. Once done and saved it will force the server to parse every file for SSI code.
# To parse .shtml files for server-side includes (SSI):
# (You will also need to add "Includes" to the "Options" directive.)
#
AddType text/html .shtml
AddOutputFilter INCLUDES .shtml
These direction are for a Lunix hosing site with GoDaddy with cPannel.
Login to your GoDaddy account online.
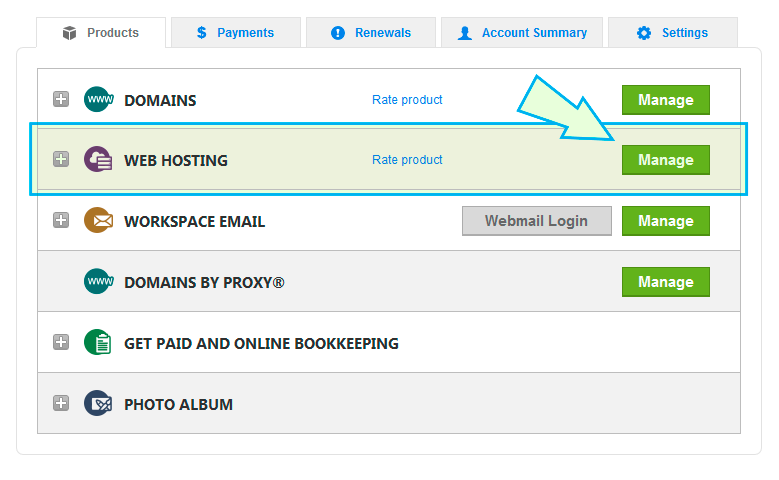
Locate the list below and select Manage on the Web Hosting area.
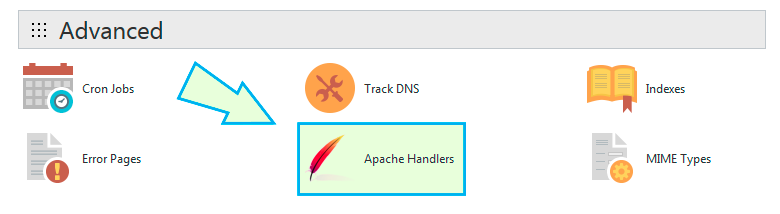
Select Apache Handlers under the Advanced section.
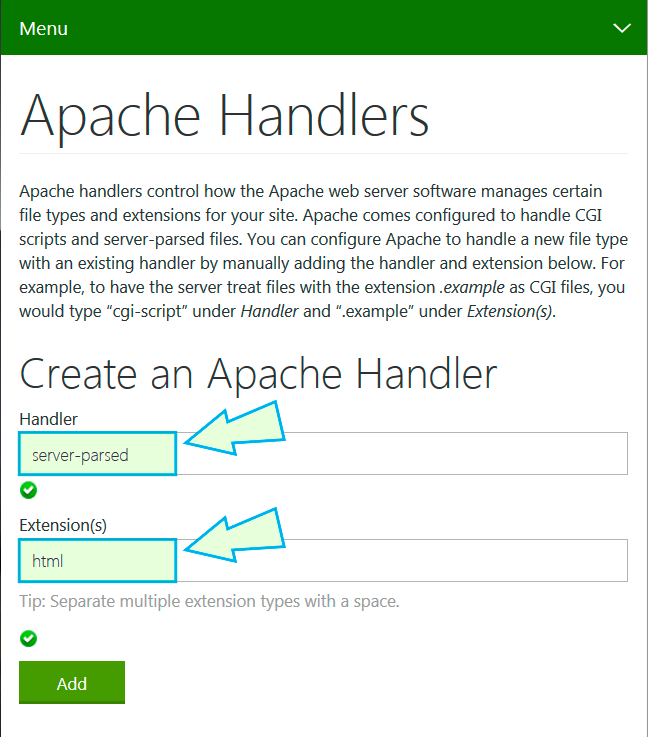
In the Handler field type server-parsed, and in the Extensions(s) field type: html. Then hit the Add button. This will make the server parse all html files for Server Side Includes. It does this by generating a file called .htaccess with the following code: AddHandler server-parsed html. It then places this file in your root web directory. You actually could do this manually by creating the file yourself and uploading it to your server.
To remotely connect to a GoDaddy account via FTP, an FTP account first needs to be set up in the GoDaddy account. Once this is done those credentials can be used to set up a FileZilla connection.
Below are some more directions to give you guidance.
Login to your GoDaddy account online.
Locate the list below and select Manage on the Web Hosting area.
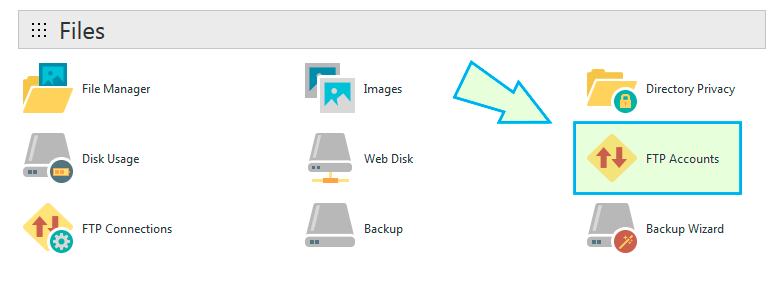
Select FTP Accounts and then set up an FTP account and make note of the credentials that you create and that are generated for you.
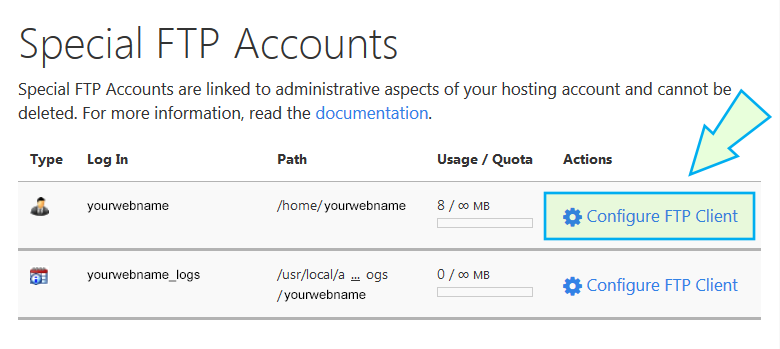
Do not add a new FTP account, but instead scroll down past the form to the Special FTP Accounts section and select the Configure FTP Client link to reveal the FTP account credentials that you will use to set up FileZilla to connect to your GoDaddy web space.
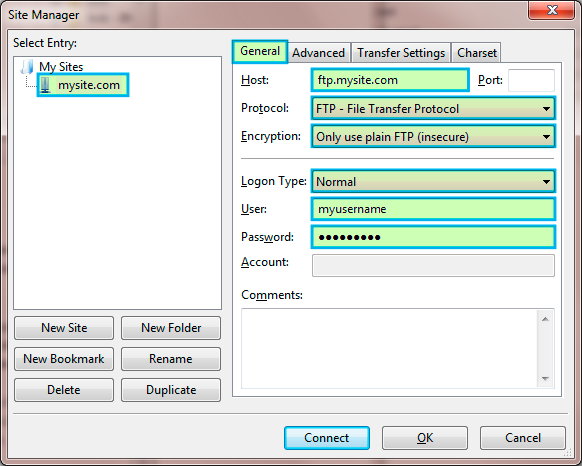
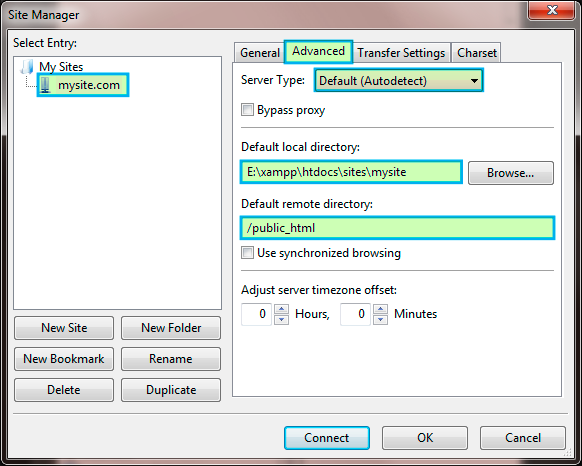
Once you have the credentials from the main FTP account including your Host:, Username:, and Password:, open up FileZilla and select the Site Manager Icon: File > Site Manager. Below are the two tabs you need to fill out, the General Tab, and the Advanced Tab.
Make sure that you fill out the Default local directory to correspond to your website location on your local computer. This makes FileZilla automatically choose your website directory location when you connect.
 2 To access the file directly, go to the xampp folder directory, and locate the file: